前言💬
在场景当中可能不止只有Directional Light,还有可能存在点光源等,其他的光源 我们之前实现的Diffuse Shader,只是针对了Directional Light进行光照着色

从上图可以看到,官方的Diffuse着色器针对不同的灯光,都有不同的响应 如果我们要去实现我们基于顶点和片元的光照程序的时候,需要去考虑场景中哪些灯光对物体有作用,哪些没有作用,关于这些内容,Unity为我们提供了一种前向渲染路径的解决方案,可以参考
前向渲染路径Forward Rendering Path
前向渲染根据影响对象的光源在一个或多个通道中渲染每个对象。光源本身也可以通过前向渲染进行不同的处理,具体取决于它们的设置和强度。
如果着色器中有一个Pass就会渲染一次,如果有多个Pass就会渲染多次 因为有多个不同的灯光需要去影响这个物体,所以就会针对多个Pass渲染多次
实现详细信息
在前向渲染中,影响每个对象的一些最亮的光源以完全逐像素光照模式渲染。然后,最多 4 个点光源采用每顶点计算方式。其他光源以球谐函数 (SH) 计算,这种计算方式会快得多,但仅得到近似值。光源是否为每像素光源根据以下原则而定:
- Render Mode 设置为 Not Important 的光源始终为每顶点或 SH 光源。

- 最亮的方向光始终为每像素光源。
- Render Mode 设置为 Important 的光源始终为每像素光源。

- If the above results in fewer lights than current Pixel Light Count
, then more lights are rendered per-pixel, in order of decreasing brightness.
Unity内置的光照🌞辅助函数
在Unity.cginc当中有很多光照的辅助函数,例如下方的ShadeSH9
// normal should be normalized, w=1.0
// output in active color space
half3 ShadeSH9 (half4 normal)
{
    // Linear + constant polynomial terms
    half3 res = SHEvalLinearL0L1 (normal);

    // Quadratic polynomials
    res += SHEvalLinearL2 (normal);

#   ifdef UNITY_COLORSPACE_GAMMA
        res = LinearToGammaSpace (res);
#   endif

    return res;
}
在我们要使用光照的时候,会遇到很多问题,比如哪些情况下用哪些光照函数 在不同渲染的Pass通道当中,会有不同的处理 例如ShadeVertexLightsFull的光照函数
// Used in Vertex pass: Calculates diffuse lighting from lightCount lights. Specifying true to spotLight is more expensive
// to calculate but lights are treated as spot lights otherwise they are treated as point lights.
float3 ShadeVertexLightsFull (float4 vertex, float3 normal, int lightCount, bool spotLight)
{
    float3 viewpos = UnityObjectToViewPos (vertex.xyz);
    float3 viewN = normalize (mul ((float3x3)UNITY_MATRIX_IT_MV, normal));

    float3 lightColor = UNITY_LIGHTMODEL_AMBIENT.xyz;
    for (int i = 0; i < lightCount; i++) {
        float3 toLight = unity_LightPosition[i].xyz - viewpos.xyz * unity_LightPosition[i].w;
        float lengthSq = dot(toLight, toLight);

        // don't produce NaNs if some vertex position overlaps with the light
        lengthSq = max(lengthSq, 0.000001);

        toLight *= rsqrt(lengthSq);

        float atten = 1.0 / (1.0 + lengthSq * unity_LightAtten[i].z);
        if (spotLight)
        {
            float rho = max (0, dot(toLight, unity_SpotDirection[i].xyz));
            float spotAtt = (rho - unity_LightAtten[i].x) * unity_LightAtten[i].y;
            atten *= saturate(spotAtt);
        }

        float diff = max (0, dot (viewN, toLight));
        lightColor += unity_LightColor[i].rgb * (diff * atten);
    }
    return lightColor;
}
这个函数是处理顶点全部的顶点光照
所以可以在顶点程序当中调用这个函数实现顶点光照 这个函数又会做一次包装
float3 ShadeVertexLights (float4 vertex, float3 normal)
{
    return ShadeVertexLightsFull (vertex, normal, 4, false);
}
调用ShadeVertexLights的时候,会制定4个光源,并且禁用聚光灯
要注意的是,这个函数只能使用在Vertex的Pass通道当中
所以需要将Pass通道当中的
tags{"LightMode"="ForwardBase"}
修改为
tags{"LightMode"="Vertex"}
完善Diffuse着色器🖌️
使用ShadeVertexLights函数,加上点光源的光照
Shader "ShaderLearning/diffuse2"
{
    SubShader
    {
        Pass
        {
            tags{"LightMode"="Vertex"}
            CGPROGRAM
            #pragma vertex vert
            #pragma fragment frag

            #include "UnityCG.cginc"
            #include "Lighting.cginc"

            struct v2f
            {
                float4 vertex: POSITION;
                fixed4 color : COLOR;
            };

            sampler2D _MainTex;
            float4 _MainTex_ST;

            v2f vert (appdata_base v)
            {
                v2f o;
                o.vertex = UnityObjectToClipPos(v.vertex);

                float3 N=normalize(mul(v.normal,(float3x3)unity_WorldToObject));
                float3 L=normalize(_WorldSpaceLightPos0);
                float ndotl=saturate(dot(N,L));
                o.color=_LightColor0*ndotl;
                o.color.rgb=ShadeVertexLights(v.vertex,v.normal);
                return o;
            }

            fixed4 frag (v2f i) : COLOR
            {

                return i.color+UNITY_LIGHTMODEL_AMBIENT;
            }
            ENDCG
        }
    }
}
要注意的是,ShadeVertexLights传入的顶点的法向量,直接是模型空间下的即可,因为在内部的ShadeVertexLightsFull函数当中已经进行了坐标系的变换

但是启用这个模式过后。你会法线这个球体光照着色的效果和系统内置的效果,有很大的不同 我们可以尝试改变一下模式
Forward Base模式下的光照🌞
我们继续查看Unity.cginc,法线Shade4PointLights函数是在ForwardBase pass通道下的
// Used in ForwardBase pass: Calculates diffuse lighting from 4 point lights, with data packed in a special way.
float3 Shade4PointLights (
    float4 lightPosX, float4 lightPosY, float4 lightPosZ,
    float3 lightColor0, float3 lightColor1, float3 lightColor2, float3 lightColor3,
    float4 lightAttenSq,
    float3 pos, float3 normal)
{
    // to light vectors
    float4 toLightX = lightPosX - pos.x;
    float4 toLightY = lightPosY - pos.y;
    float4 toLightZ = lightPosZ - pos.z;
    // squared lengths
    float4 lengthSq = 0;
    lengthSq += toLightX * toLightX;
    lengthSq += toLightY * toLightY;
    lengthSq += toLightZ * toLightZ;
    // don't produce NaNs if some vertex position overlaps with the light
    lengthSq = max(lengthSq, 0.000001);

    // NdotL
    float4 ndotl = 0;
    ndotl += toLightX * normal.x;
    ndotl += toLightY * normal.y;
    ndotl += toLightZ * normal.z;
    // correct NdotL
    float4 corr = rsqrt(lengthSq);
    ndotl = max (float4(0,0,0,0), ndotl * corr);
    // attenuation
    float4 atten = 1.0 / (1.0 + lengthSq * lightAttenSq);
    float4 diff = ndotl * atten;
    // final color
    float3 col = 0;
    col += lightColor0 * diff.x;
    col += lightColor1 * diff.y;
    col += lightColor2 * diff.z;
    col += lightColor3 * diff.w;
    return col;
}
所以我们可以利用这个光照函数 lightPosX, lightPosY, lightPosZ是光源的位置 lightColor0, lightColor1, lightColor2, lightColor3是光的颜色 lightAttenSq是光的衰减系数 pos 和 normal,要传入世界空间下的坐标 这个函数要传入的函数很多,关于光源位置,光的颜色,还有光的衰减系数,可以从Unity内置的变量当中获取 在UnityShader Variables.cginc
    float4 unity_4LightPosX0;
    float4 unity_4LightPosY0;
    float4 unity_4LightPosZ0;
    half4 unity_4LightAtten0;

    half4 unity_LightColor[8];
调用代码如下方所示
                o.color.rgb=Shade4PointLights(unity_4LightPosX0,
                unity_4LightPosY0,
                unity_4LightPosZ0,
                unity_LightColor[0].rgb,unity_LightColor[1].rgb,
                unity_LightColor[2].rgb,unity_LightColor[3].rgb,
                unity_4LightAtten0,wpos,N);
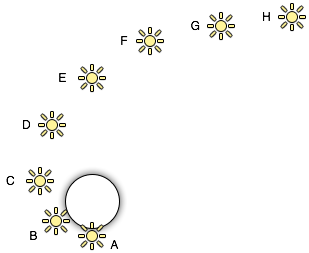
这样写有一个问题,这会将我们之前_LightColor0*ndotl的颜色给覆盖掉,也就是说,没有吧Directional Light参与计算的光照给附加上去,所以就会呈现如下图所示的效果(最下面的物体)

我们只需要将=号改成+=即可 完整代码如下:
Shader "ShaderLearning/diffuse3"
{
    SubShader
    {
        Pass
        {
            tags{"LightMode"="ForwardBase"}
            CGPROGRAM
            #pragma vertex vert
            #pragma fragment frag

            #include "UnityCG.cginc"
            #include "Lighting.cginc"

            struct v2f
            {
                float4 vertex: POSITION;
                fixed4 color : COLOR;
            };

            sampler2D _MainTex;
            float4 _MainTex_ST;

            v2f vert (appdata_base v)
            {
                v2f o;
                o.vertex = UnityObjectToClipPos(v.vertex);

                float3 N=normalize(mul(v.normal,(float3x3)unity_WorldToObject));
                float3 L=normalize(_WorldSpaceLightPos0);
                float ndotl=saturate(dot(N,L));
                o.color=_LightColor0*ndotl;

                float3 wpos=mul(unity_ObjectToWorld,v.vertex).xyz;

                o.color.rgb+=Shade4PointLights(unity_4LightPosX0,
                unity_4LightPosY0,
                unity_4LightPosZ0,
                unity_LightColor[0].rgb,unity_LightColor[1].rgb,
                unity_LightColor[2].rgb,unity_LightColor[3].rgb,
                unity_4LightAtten0,wpos,N);

                return o;
            }

            fixed4 frag (v2f i) : COLOR
            {

                return i.color+UNITY_LIGHTMODEL_AMBIENT;
            }
            ENDCG
        }
    }
}
最终效果如下图所示⬇️

在Forward rendering path中关于不同数量的灯光
影响每个对象的一些最亮的光源以完全逐像素光照模式渲染。然后,最多 4 个点光源采用每顶点计算方式。其他光源以球谐函数 (SH) 计算
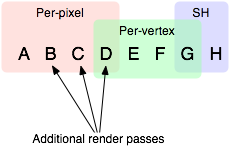
A 到 H 具有相同的颜色和强度,并且所有光源都具有自动渲染模式, 因此它们将严格按照此对象的以下顺序排序。 最亮的光源将以每像素光照模式渲染(A 到 D), 然后最多 4 个光源以每顶点光照模式渲染(D 到 G), 最后其余光源以 SH 进行渲染(G 到 H)
如果要实现更复杂的光照,编写有关光和物体交互的Shader, Unity官方建议编写SurfaceShader来达到效果


...