- 完整案例代码
Shader "Learning/2.SurfaceShader/SurfaceShader1"
{
Properties
{
_Color ("Color", Color) = (1,1,1,1)
_MainTex ("Albedo (RGB)", 2D) = "white" {}
_Glossiness ("Smoothness", Range(0,1)) = 0.5
_Metallic ("Metallic", Range(0,1)) = 0.0
}
SubShader
{
Tags { "RenderType"="Opaque" }
LOD 200

CGPROGRAM
// Physically based Standard lighting model, and enable shadows on all light types
#pragma surface surf Standard fullforwardshadows

// Use shader model 3.0 target, to get nicer looking lighting
#pragma target 3.0

sampler2D _MainTex;

struct Input
{
float2 uv_MainTex;
};

half _Glossiness;
half _Metallic;
fixed4 _Color;

// Add instancing support for this shader. You need to check 'Enable Instancing' on materials that use the shader.
// See https://docs.unity3d.com/Manual/GPUInstancing.html for more information about instancing.
// #pragma instancing_options assumeuniformscaling
UNITY_INSTANCING_BUFFER_START(Props)
// put more per-instance properties here
UNITY_INSTANCING_BUFFER_END(Props)

void surf (Input IN, inout SurfaceOutputStandard o)
{
// Albedo comes from a texture tinted by color
fixed4 c = tex2D (_MainTex, IN.uv_MainTex) * _Color;
o.Albedo = c.rgb;
// Metallic and smoothness come from slider variables
o.Metallic = _Metallic;
o.Smoothness = _Glossiness;
o.Alpha = c.a;
}
ENDCG
}
FallBack "Diffuse"
}

SubShader
💡 SurfaceShader是对Vertex与FragmentShader的一种包装 SubShader中没有Pass通道,如果一旦添加了Pass通道则会报错
Tags
Tags { "RenderType"="Opaque" }//渲染类型,Opaque表示这个渲染的是一个不透明的物体
CGPROGRAM是一个CG语言的代码块,一般以CGPROGRAM开头,ENDCG结尾
#pragma 编译指令
💡 标准格式如下
#pragma surface surfaceFunction lightModel [optionalparams]
- surface 表示声明这是一个surfaceShader,让Unity进行编译处理
- surface Function 是声明表面着色器的处理方法(默认是surf)和下方生成的surf方法名称要一致
- lightModel 声明光照模型,在默认创建的表面着色器当中使用的是Standard,(这里的光照模型实际上也是一个函数,可以在Unity编辑器路径中的DataCGIncludes文件夹中找到) (在自己编写光照函数的时候前面必须加上“Lighting”否则ShaderLab无法识别)

- optionalParams其他的选项参数
默认的fullforwardshadows,是生成支持前向渲染路径的阴影 默认的Shader在前向渲染中只支持一个directional light生成阴影 如果需要在前向渲染中支持PointLight或者SpotLight的阴影,需要使用directive
#pragma target 3.0
💡 说明将使用硬件的Shader Model 3.0 版本越高Shader的功能越多 如果没有指定默认使用的是ShaderModel2.0 (使用ShaderModel3.0可以获得一个更好看的光照效果) 💡 sampler2D _MainTex;是对 _MainTex属性的一个变量声明 💡 这是一个结构体 用于对UV纹理坐标的输入 *编写的着色器uv纹理采样变量声明一定要以uv或者uv2开头,(否则)ShaderLab将无法识别处理
struct Input
{
 float2 uv_MainTex;
};
如果声明了一个_MainTex ("Albedo (RGB)", 2D) = "white" {}的纹理采样属性 那么结构体中命名uv纹理采样的变量名必须以uv开头,并且uv后面的名称要和属性名一样 例如:uv_MainTex
half _Glossiness;
half _Metallic;
fixed4 _Color;
💡 对其他三个属性的变量声明,光泽度,金属度,颜色
在CG程序中,需要对Shader中所有的Proprieties的属性,都进行变量的声明 Properties中的类型与CG当中的类型不是对应的 常用的对应类型可以查看下方表格
Proprieties
CG
2D
sampler2D
Color
fixed4
Range
half
Input表面着色器输入结构
输入结构 Input 通常具有着色器所需的所有纹理坐标。纹理坐标必须命名为“uv”后跟纹理名称的形式(如果要使用第二个纹理坐标集,则以“uv2”开头)。 可以放入输入结构的其他值:
float3 viewDir- 包含视图方向,用于计算视差效果、边缘光照等等。- 具有
COLOR语义的float4- 包含插值的每顶点颜色。 float4 screenPos- 包含反射或屏幕空间效果的屏幕空间位置。请注意,这不适合;您需要使用
ComputeGrabScreenPos函数自己计算自定义 UV。float3 worldPos- 包含世界空间位置。float3 worldRefl- 在_表面着色器不写入 o.Normal_ 的情况下,包含世界反射矢量。有关示例,请参阅反光漫射 (Reflect-Diffuse) 着色器。float3 worldNormal- 在_表面着色器不写入 o.Normal_ 的情况下,包含世界法线矢量。float3 worldRefl; INTERNAL_DATA- 在_表面着色器写入 o.Normal_ 的情况下,包含世界反射矢量。要获得基于每像素法线贴图的反射矢量,请使用WorldReflectionVector (IN, o.Normal)。有关示例,请参阅反光凹凸 (Reflect-Bumped) 着色器。float3 worldNormal; INTERNAL_DATA- 在_表面着色器写入 o.Normal_ 的情况下,包含世界法线矢量。要获得基于每像素法线贴图的法线矢量,请使用WorldNormalVector (IN, o.Normal)。
surf函数
void surf (Input IN, inout SurfaceOutputStandard o)
 {
 // Albedo comes from a texture tinted by color
 fixed4 c = tex2D (_MainTex, IN.uv_MainTex) * _Color;
 o.Albedo = c.rgb;
 // Metallic and smoothness come from slider variables
 o.Metallic = _Metallic;
 o.Smoothness = _Glossiness;
 o.Alpha = c.a;
 }
参数中的inout 表示既是输入也是输出,也就是定义了后面的SurfaceOutputStandard结构是输入结构又是输出结构
可以定义一个“表面函数”,它将您需要的所有 UV 或数据作为输入,并填充输出结构 SurfaceOutput。SurfaceOutput 基本上描述了_表面的属性_(反照率颜色、法线、发光、镜面反射等)。您需要使用 HLSL 编写此代码。 表面着色器编译器随后计算出需要的输入、填充的输出等等,并生成实际的
以及渲染通道来处理前向和延迟渲染。 以下是表面着色器的标准输出结构 (不是基于PBR的效果会差一点,但是性能会好一点,Unity5之前的版本使用)
struct SurfaceOutput
{
 fixed3 Albedo; // 漫射颜色
 fixed3 Normal; // 切线空间法线(如果已写入)
 fixed3 Emission;
 half Specular; // 0..1 范围内的镜面反射能力
 fixed Gloss; // 镜面反射强度
 fixed Alpha; // 透明度 Alpha
};
在 Unity 5 中,表面着色器还可以使用基于物理的光照模型。内置标准光照模型和标准镜面反射光照模型(见下文)分别使用以下输出结构:
struct SurfaceOutputStandard
{
 fixed3 Albedo; // 基础(漫射或镜面反射)颜色
 fixed3 Normal; // 切线空间法线(如果已写入)
 half3 Emission;
 half Metallic; // 0=非金属,1=金属
 half Smoothness; // 0=粗糙,1=平滑
 half Occlusion; // 遮挡(默认为 1)
 fixed Alpha; // 透明度 Alpha
};
struct SurfaceOutputStandardSpecular
{
 fixed3 Albedo; // 漫射颜色
 fixed3 Specular; // 镜面反射颜色
 fixed3 Normal; // 切线空间法线(如果已写入)
 half3 Emission;
 half Smoothness; // 0=粗糙,1=平滑
 half Occlusion; // 遮挡(默认为 1)
 fixed Alpha; // 透明度 Alpha
};
- 从纹理当中采样颜色,使用Cg当中的tex2D方法,需要传入纹理和nv坐标,最后的*_Color是叠加的颜色
fixed4 c = tex2D (_MainTex, IN.uv_MainTex) * _Color; - 颜色取rgb值赋给输出结构体中的Albedo基础颜色变量
o.Albedo = c.rgb; - 其他的属性也同样对结构体中的变量进行赋值,输出结构体中的Alpha
o.Alpha赋值为采样出来的纹理颜色c的Alpha值c.a
o.Metallic = _Metallic;
o.Smoothness = _Glossiness;
o.Alpha = c.a;
Unity内置的光照模型
💡 Unity内置的光照模型在CGIncludes文件夹内的Lighting.cginc

-
Unity内置的光照模型CG代码 ``` #ifndef LIGHTING_INCLUDED #define LIGHTING_INCLUDED
#include “UnityLightingCommon.cginc” #include “UnityGBuffer.cginc” #include “UnityGlobalIllumination.cginc” struct SurfaceOutput { fixed3 Albedo; fixed3 Normal; fixed3 Emission; half Specular; fixed Gloss; fixed Alpha; }; #ifndef USING_DIRECTIONAL_LIGHT #if defined (DIRECTIONAL_COOKIE) defined (DIRECTIONAL) #define USING_DIRECTIONAL_LIGHT #endif #endif #if defined(UNITY_SHOULD_SAMPLE_SH) defined(LIGHTMAP_ON) defined(DYNAMICLIGHTMAP_ON) #define UNITY_LIGHT_FUNCTION_APPLY_INDIRECT #endif inline fixed4 UnityLambertLight (SurfaceOutput s, UnityLight light) { fixed diff = max (0, dot (s.Normal, light.dir)); fixed4 c; c.rgb = s.Albedo * light.color * diff; c.a = s.Alpha; return c; } inline fixed4 LightingLambert (SurfaceOutput s, UnityGI gi) { fixed4 c; c = UnityLambertLight (s, gi.light); #ifdef UNITY_LIGHT_FUNCTION_APPLY_INDIRECT c.rgb += s.Albedo * gi.indirect.diffuse; #endif return c; } inline half4 LightingLambert_Deferred (SurfaceOutput s, UnityGI gi, out half4 outGBuffer0, out half4 outGBuffer1, out half4 outGBuffer2) { UnityStandardData data; data.diffuseColor = s.Albedo; data.occlusion = 1; data.specularColor = 0; data.smoothness = 0; data.normalWorld = s.Normal; UnityStandardDataToGbuffer(data, outGBuffer0, outGBuffer1, outGBuffer2); half4 emission = half4(s.Emission, 1); #ifdef UNITY_LIGHT_FUNCTION_APPLY_INDIRECT emission.rgb += s.Albedo * gi.indirect.diffuse; #endif return emission; } inline void LightingLambert_GI ( SurfaceOutput s, UnityGIInput data, inout UnityGI gi) { gi = UnityGlobalIllumination (data, 1.0, s.Normal); } inline fixed4 LightingLambert_PrePass (SurfaceOutput s, half4 light) { fixed4 c; c.rgb = s.Albedo * light.rgb; c.a = s.Alpha; return c; } // NOTE: some intricacy in shader compiler on some GLES2.0 platforms (iOS) needs ‘viewDir’ & ‘h’ // to be mediump instead of lowp, otherwise specular highlight becomes too bright. inline fixed4 UnityBlinnPhongLight (SurfaceOutput s, half3 viewDir, UnityLight light) { half3 h = normalize (light.dir + viewDir); fixed diff = max (0, dot (s.Normal, light.dir)); float nh = max (0, dot (s.Normal, h)); float spec = pow (nh, s.Specular*128.0) * s.Gloss; fixed4 c; c.rgb = s.Albedo * light.color * diff + light.color * _SpecColor.rgb * spec; c.a = s.Alpha; return c; } inline fixed4 LightingBlinnPhong (SurfaceOutput s, half3 viewDir, UnityGI gi) { fixed4 c; c = UnityBlinnPhongLight (s, viewDir, gi.light); #ifdef UNITY_LIGHT_FUNCTION_APPLY_INDIRECT c.rgb += s.Albedo * gi.indirect.diffuse; #endif return c; } inline half4 LightingBlinnPhong_Deferred (SurfaceOutput s, half3 viewDir, UnityGI gi, out half4 outGBuffer0, out half4 outGBuffer1, out half4 outGBuffer2) { UnityStandardData data; data.diffuseColor = s.Albedo; data.occlusion = 1; // PI factor come from StandardBDRF (UnityStandardBRDF.cginc:351 for explanation) data.specularColor = _SpecColor.rgb * s.Gloss * (1/UNITY_PI); data.smoothness = s.Specular; data.normalWorld = s.Normal; UnityStandardDataToGbuffer(data, outGBuffer0, outGBuffer1, outGBuffer2); half4 emission = half4(s.Emission, 1); #ifdef UNITY_LIGHT_FUNCTION_APPLY_INDIRECT emission.rgb += s.Albedo * gi.indirect.diffuse; #endif return emission; } inline void LightingBlinnPhong_GI ( SurfaceOutput s, UnityGIInput data, inout UnityGI gi) { gi = UnityGlobalIllumination (data, 1.0, s.Normal); } inline fixed4 LightingBlinnPhong_PrePass (SurfaceOutput s, half4 light) { fixed spec = light.a * s.Gloss; fixed4 c; c.rgb = (s.Albedo * light.rgb + light.rgb * _SpecColor.rgb * spec); c.a = s.Alpha; return c; } #ifdef UNITY_CAN_COMPILE_TESSELLATION struct UnityTessellationFactors { float edge[3] : SV_TessFactor; float inside : SV_InsideTessFactor; }; #endif // UNITY_CAN_COMPILE_TESSELLATION // Deprecated, kept around for existing user shaders. #define UNITY_DIRBASIS const half3x3 unity_DirBasis = half3x3( half3( 0.81649658, 0.0, 0.57735027), half3(-0.40824830, 0.70710678, 0.57735027), half3(-0.40824830, -0.70710678, 0.57735027) ); // Deprecated, kept around for existing user shaders. Only sampling the flat lightmap now. half3 DirLightmapDiffuse(in half3x3 dirBasis, fixed4 color, fixed4 scale, half3 normal, bool surfFuncWritesNormal, out half3 scalePerBasisVector) { scalePerBasisVector = 1; return DecodeLightmap (color); } #endif ```
lightModel- 要使用的光照模型。 内置光照模型是基于物理的Standard和StandardSpecular,以及简单的非基于物理的Lambert(漫射)和BlinnPhong(镜面反射)。请参阅页面以了解如何编写自己的光照模型。
Standard光照模型使用SurfaceOutputStandard输出结构,并与 Unity 中的标准(金属性工作流)着色器匹配。StandardSpecular光照模型使用SurfaceOutputStandardSpecular输出结构,并与 Unity 中的标准(镜面反射设置)着色器匹配。Lambert和BlinnPhong光照模型不是基于物理的(来自 Unity 4.x),但使用这两个光照模型的着色器在低端硬件上可以提高渲染速度。
实现SurfaceShader下的物体透明效果
在SurfaceShader中使用Alpha混合实现透明效果 **透明度和 Alpha 测试**由 `alpha` 和 `alphatest` 指令控制。透明度通常可以有两种:传统的 Alpha 混合(用于淡出对象)或更符合物理规律的“预乘混合”(允许半透明表面保留适当的镜面反射)。启用半透明度会使生成的表面着色器代码包含
命令;而启用 Alpha 镂空将根据给定的变量在生成的像素着色器中执行片元废弃。
-
alpha或alpha:auto- 对于简单的光照函数,将选择淡化透明度(与alpha:fade相同);对于基于物理的光照函数,将选择预乘透明度(与alpha:premul相同)。 -
alpha:blend- 启用 Alpha 混合。 -
alpha:fade- 启用传统淡化透明度。 -
alpha:premul- 启用预乘 Alpha 透明度。 -
alphatest:VariableName- 启用 Alpha 镂空透明度。剪切值位于具有 VariableName 的浮点变量中。您可能还想使用addshadow指令生成正确的阴影投射物通道。 -
keepalpha- 默认情况下,无论输出结构的 Alpha 输出是什么,或者光照函数返回什么,不透明表面着色器都将 1.0(白色)写入 Alpha 通道。使用此选项可以保持光照函数的 Alpha 值,即使对于不透明的表面着色器也是如此。 -
decal:add- 附加贴花着色器(例如 terrain AddPass)。这适用于位于其他表面之上并使用附加混合的对象。请参阅 -
decal:blend- 半透明贴花着色器。这适用于位于其他表面之上并使用 Alpha 混合的对象。请参阅材质的Alpha Source设置为FromGrayScale

### 在Tags中指定渲染序列

`"queue"="transparent"`

💡 对于透明物体来说可能不需要阴影,所以可以将fullforwardshadows 给去掉 💡 但此时阴影还会保留…..

## 原因在于`FallBack` 中使用了`"Diffuse"` 它自带一个阴影投射器通道

💡 **解决方法:将FallBack注释掉即可 Tips:当Shader中没有指定阴影投射器时,FallBack中指定Shader的如果存在阴影投射器则会启用**

> 如果没有`FallBack`,可以在`#pragma`中使用`addshadow`启用阴影投射通道

*   Unity5.0以上完整代码 \`\`\` Shader "Learning/2.SurfaceShader/SurfaceShader1" { Properties { \_Color ("Color", Color) = (1,1,1,1) \_MainTex ("Albedo (RGB)", 2D) = "white" {} \_Glossiness ("Smoothness", Range(0,1)) = 0.5 \_Metallic ("Metallic", Range(0,1)) = 0.0 } SubShader { Tags { "RenderType"="Opaque" "queue"="transparent" } LOD 200 </p></li> </ul> <p>CGPROGRAM // Physically based Standard lighting model, and enable shadows on all light types //fullforwardshadows #pragma surface surf Standard alpha // Use shader model 3.0 target, to get nicer looking lighting #pragma target 3.0 sampler2D \_MainTex; struct Input { float2 uv\_MainTex; }; half \_Glossiness; half \_Metallic; fixed4 \_Color; // Add instancing support for this shader. You need to check 'Enable Instancing' on materials that use the shader. // See https://docs.unity3d.com/Manual/GPUInstancing.html for more information about instancing. // #pragma instancing\_options assumeuniformscaling UNITY\_INSTANCING\_BUFFER\_START(Props) // put more per-instance properties here UNITY\_INSTANCING\_BUFFER\_END(Props) void surf (Input IN, inout SurfaceOutputStandard o) { // Albedo comes from a texture tinted by color fixed4 c = tex2D (\_MainTex, IN.uv\_MainTex) \* \_Color; o.Albedo = c.rgb; // Metallic and smoothness come from slider variables o.Metallic = \_Metallic; o.Smoothness = \_Glossiness; o.Alpha = c.a; } ENDCG } //FallBack "Diffuse" } \`\`\`
    *   Unity5.0以下完整代码 \`\`\` Shader "Learning/2.SurfaceShader/SurfaceShader1" { Properties { \_MainTex ("Albedo (RGB)", 2D) = "white" {} } SubShader { Tags { "RenderType"="Opaque" "queue"="transparent" } LOD 200 </p></li> </ul> <p>CGPROGRAM // Physically based Standard lighting model, and enable shadows on all light types //fullforwardshadows #pragma surface surf Lambert fullforwardshadows alpha // Use shader model 3.0 target, to get nicer looking lighting #pragma target 3.0 sampler2D \_MainTex; struct Input { float2 uv\_MainTex; }; void surf (Input IN, inout SurfaceOutput o) { // Albedo comes from a texture tinted by color fixed4 c = tex2D (\_MainTex, IN.uv\_MainTex); o.Albedo = c.rgb; o.Alpha = c.a; } ENDCG } //FallBack "Diffuse" } \`\`\`

        # 光照多样化以及自定义光照

        *   表面着色器示例
在内置渲染管线中,表面着色器是编写与光照交互的着色器的一种简化方式。
            ## **渲染管线兼容性**


        功能名称

        内置渲染管线

        通用渲染管线 (URP)

        高清渲染管线 (HDRP)

        自定义 SRP

        表面着色器

        是

        否有关在 URP 中创建 Shader 对象的简化方法,请参阅 https://docs.unity3d.com/cn/current/Manual/shader-graph.html。

        否有关在 HDRP 中创建 Shader 对象的简化方法,请参阅 https://docs.unity3d.com/cn/current/Manual/shader-graph.html。

        否

        \## **简单的着色器示例** 我们将从一个非常简单的着色器 (Shader) 开始,并在此基础上加以丰富。下面的着色器将表面颜色设置为“白色”。它使用内置的兰伯特(漫射)光照模型。 \`\`\` Shader "Example/Diffuse Simple" { SubShader { Tags { "RenderType" = "Opaque" } CGPROGRAM #pragma surface surf Lambert struct Input { float4 color : COLOR; }; void surf (Input IN, inout SurfaceOutput o) { o.Albedo = 1; } ENDCG } Fallback "Diffuse" } \`\`\` 以下是设置了两个
的模型:
纹理 一个全白的对象很无聊,所以让我们添加一个纹理。我们将向着色器添加
代码块,这样我们将在材质中看到纹理选择器。 ``` Shader “Example/Diffuse Texture” { Properties { _MainTex (“Texture”, 2D) = “white” {} } SubShader { Tags { “RenderType” = “Opaque” } CGPROGRAM #pragma surface surf Lambert struct Input { float2 uv_MainTex; }; sampler2D _MainTex; void surf (Input IN, inout SurfaceOutput o) { o.Albedo = tex2D (_MainTex, IN.uv_MainTex).rgb; } ENDCG } Fallback “Diffuse” } ```
法线贴图 我们来添加一些法线贴图: ``` Shader “Example/Diffuse Bump” { Properties { _MainTex (“Texture”, 2D) = “white” {} _BumpMap (“Bumpmap”, 2D) = “bump” {} } SubShader { Tags { “RenderType” = “Opaque” } CGPROGRAM #pragma surface surf Lambert struct Input { float2 uv_MainTex; float2 uv_BumpMap; }; sampler2D _MainTex; sampler2D _BumpMap; void surf (Input IN, inout SurfaceOutput o) { o.Albedo = tex2D (_MainTex, IN.uv_MainTex).rgb; o.Normal = UnpackNormal (tex2D (_BumpMap, IN.uv_BumpMap)); } ENDCG } Fallback “Diffuse” } ```
边缘光照 现在,尝试添加一些边缘光照以突出游戏对象的边缘。我们将根据表面法线和视图方向之间的角度添加一些发射光照。为此,我们将使用内置的表面着色器变量 viewDir。 ``` Shader “Example/Rim” { Properties { _MainTex (“Texture”, 2D) = “white” {} _BumpMap (“Bumpmap”, 2D) = “bump” {} _RimColor (“Rim Color”, Color) = (0.26,0.19,0.16,0.0) _RimPower (“Rim Power”, Range(0.5,8.0)) = 3.0 } SubShader { Tags { “RenderType” = “Opaque” } CGPROGRAM #pragma surface surf Lambert struct Input { float2 uv_MainTex; float2 uv_BumpMap; float3 viewDir; }; sampler2D _MainTex; sampler2D _BumpMap; float4 _RimColor; float _RimPower; void surf (Input IN, inout SurfaceOutput o) { o.Albedo = tex2D (_MainTex, IN.uv_MainTex).rgb; o.Normal = UnpackNormal (tex2D (_BumpMap, IN.uv_BumpMap)); half rim = 1.0 - saturate(dot (normalize(IN.viewDir), o.Normal)); o.Emission = _RimColor.rgb * pow (rim, _RimPower); } ENDCG } Fallback “Diffuse” } ```
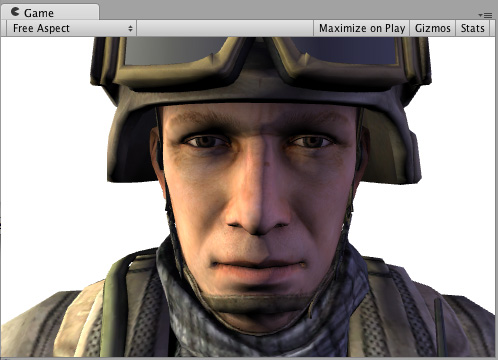
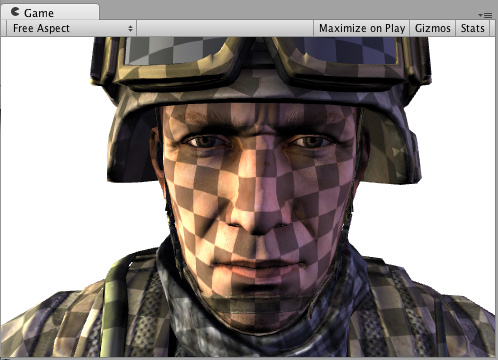
细节纹理 为获得不同效果,让我们添加一个与基础纹理结合的细节纹理。细节纹理通常在材质中使用相同的 UV,但使用不同平铺,因此我们需要使用不同的输入 UV 坐标。 ``` Shader “Example/Detail” { Properties { _MainTex (“Texture”, 2D) = “white” {} _BumpMap (“Bumpmap”, 2D) = “bump” {} _Detail (“Detail”, 2D) = “gray” {} } SubShader { Tags { “RenderType” = “Opaque” } CGPROGRAM #pragma surface surf Lambert struct Input { float2 uv_MainTex; float2 uv_BumpMap; float2 uv_Detail; }; sampler2D _MainTex; sampler2D _BumpMap; sampler2D _Detail; void surf (Input IN, inout SurfaceOutput o) { o.Albedo = tex2D (_MainTex, IN.uv_MainTex).rgb; o.Albedo *= tex2D (_Detail, IN.uv_Detail).rgb * 2; o.Normal = UnpackNormal (tex2D (_BumpMap, IN.uv_BumpMap)); } ENDCG } Fallback “Diffuse” } ``` 使用纹理棋盘格不一定有实际意义,但在此示例中可用于说明其作用
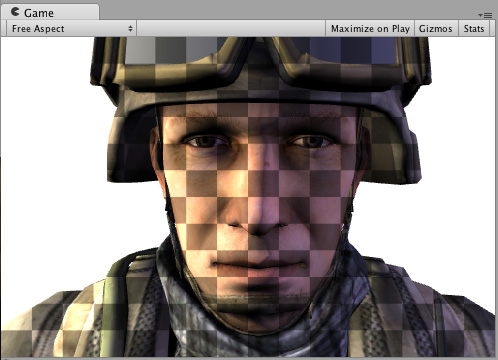
屏幕空间中的细节纹理 屏幕空间中的细节纹理对于士兵头部模型没有实际意义,但是在这里可用于说明如何使用内置的 screenPos 输入: ``` Shader “Example/ScreenPos” { Properties { _MainTex (“Texture”, 2D) = “white” {} _Detail (“Detail”, 2D) = “gray” {} } SubShader { Tags { “RenderType” = “Opaque” } CGPROGRAM #pragma surface surf Lambert struct Input { float2 uv_MainTex; float4 screenPos; }; sampler2D _MainTex; sampler2D _Detail; void surf (Input IN, inout SurfaceOutput o) { o.Albedo = tex2D (_MainTex, IN.uv_MainTex).rgb; float2 screenUV = IN.screenPos.xy / IN.screenPos.w; screenUV *= float2(8,6); o.Albedo *= tex2D (_Detail, screenUV).rgb * 2; } ENDCG } Fallback “Diffuse” } ``` 从上面的着色器删除了法线贴图,只是为了缩短代码长度
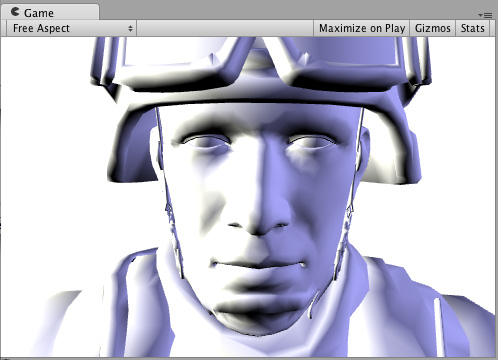
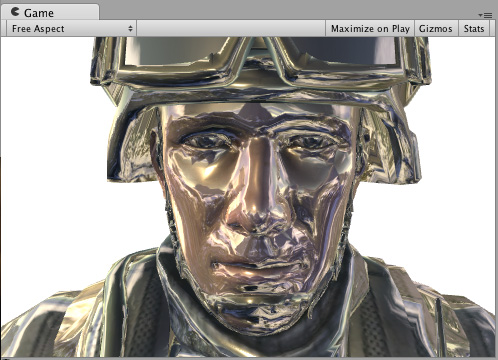
立方体贴图反射 下面的着色器将使用内置 worldRefl 输入来进行立方体贴图反射。它与内置的反射/漫射着色器非常类似: ``` Shader “Example/WorldRefl” { Properties { _MainTex (“Texture”, 2D) = “white” {} _Cube (“Cubemap”, CUBE) = "" {} } SubShader { Tags { “RenderType” = “Opaque” } CGPROGRAM #pragma surface surf Lambert struct Input { float2 uv_MainTex; float3 worldRefl; }; sampler2D _MainTex; samplerCUBE _Cube; void surf (Input IN, inout SurfaceOutput o) { o.Albedo = tex2D (_MainTex, IN.uv_MainTex).rgb * 0.5; o.Emission = texCUBE (_Cube, IN.worldRefl).rgb; } ENDCG } Fallback “Diffuse” } ``` 因为它将反射颜色指定为 Emission,所以我们得到了一个非常闪亮的士兵
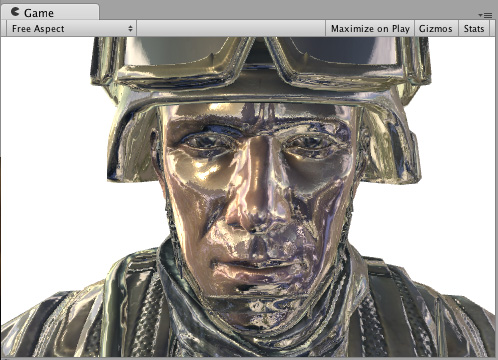
如果您想做一些受法线贴图影响的反射,需要稍微复杂一些:需要将 INTERNAL_DATA 添加到 Input 结构,并使用 WorldReflectionVector 函数在写入法线输出后计算每像素反射矢量。 ``` Shader “Example/WorldRefl Normalmap” { Properties { _MainTex (“Texture”, 2D) = “white” {} _BumpMap (“Bumpmap”, 2D) = “bump” {} _Cube (“Cubemap”, CUBE) = "" {} } SubShader { Tags { “RenderType” = “Opaque” } CGPROGRAM #pragma surface surf Lambert struct Input { float2 uv_MainTex; float2 uv_BumpMap; float3 worldRefl; INTERNAL_DATA }; sampler2D _MainTex; sampler2D _BumpMap; samplerCUBE _Cube; void surf (Input IN, inout SurfaceOutput o) { o.Albedo = tex2D (_MainTex, IN.uv_MainTex).rgb * 0.5; o.Normal = UnpackNormal (tex2D (_BumpMap, IN.uv_BumpMap)); o.Emission = texCUBE (_Cube, WorldReflectionVector (IN, o.Normal)).rgb; } ENDCG } Fallback “Diffuse” } ``` 下面是一个进行了法线贴图的闪亮士兵:
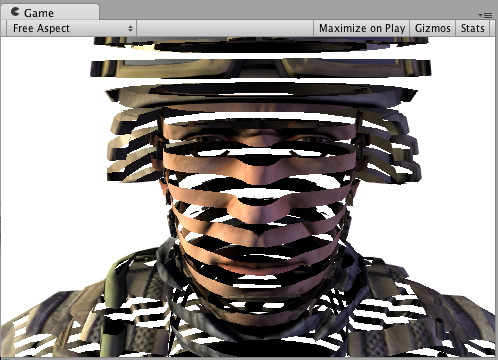
通过世界空间位置进行的切片 下面的着色器通过丢弃几乎水平的环形中的像素来对游戏对象“切片”。为实现此效果,它使用了基于像素世界位置的 Cg/HLSL 函数 clip()。我们将使用内置的表面着色器变量 worldPos。 ``` Shader “Example/Slices” { Properties { _MainTex (“Texture”, 2D) = “white” {} _BumpMap (“Bumpmap”, 2D) = “bump” {} } SubShader { Tags { “RenderType” = “Opaque” } Cull Off CGPROGRAM #pragma surface surf Lambert struct Input { float2 uv_MainTex; float2 uv_BumpMap; float3 worldPos; }; sampler2D _MainTex; sampler2D _BumpMap; void surf (Input IN, inout SurfaceOutput o) { clip (frac((IN.worldPos.y+IN.worldPos.z*0.1) * 5) - 0.5); o.Albedo = tex2D (_MainTex, IN.uv_MainTex).rgb; o.Normal = UnpackNormal (tex2D (_BumpMap, IN.uv_BumpMap)); } ENDCG } Fallback “Diffuse” } ```
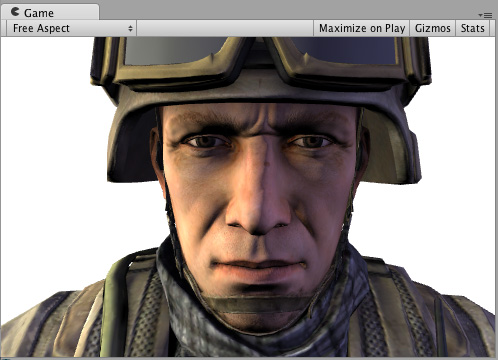
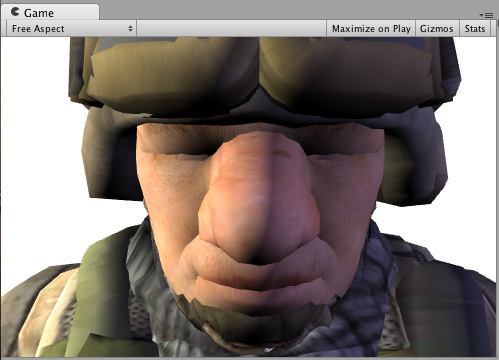
使用顶点修改器进行法线挤出 可以使用“顶点修改器”函数来修改顶点着色器中的传入顶点数据。这可用于程序化动画和沿法线挤出等操作。表面着色器编译指令 vertex:functionName 将用于此目的,其中的一个函数采用 inout appdata_full 参数。 以下着色器沿着法线按照材质中指定的量移动顶点: ``` Shader “Example/Normal Extrusion” { Properties { _MainTex (“Texture”, 2D) = “white” {} _Amount (“Extrusion Amount”, Range(-1,1)) = 0.5 } SubShader { Tags { “RenderType” = “Opaque” } CGPROGRAM #pragma surface surf Lambert vertex:vert struct Input { float2 uv_MainTex; }; float _Amount; void vert (inout appdata_full v) { v.vertex.xyz += v.normal * _Amount; } sampler2D _MainTex; void surf (Input IN, inout SurfaceOutput o) { o.Albedo = tex2D (_MainTex, IN.uv_MainTex).rgb; } ENDCG } Fallback “Diffuse” } ``` 沿着法线移动顶点会产生一个肥胖的士兵
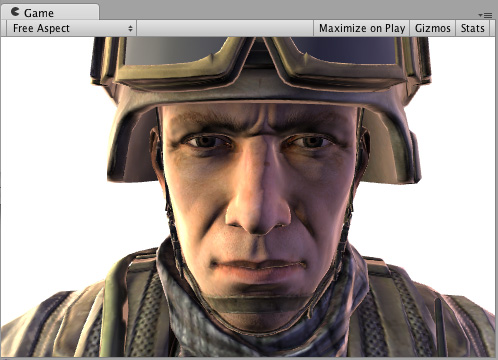
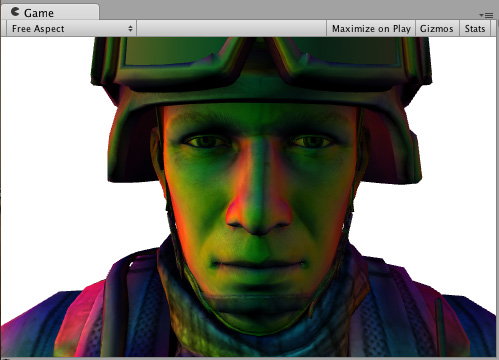
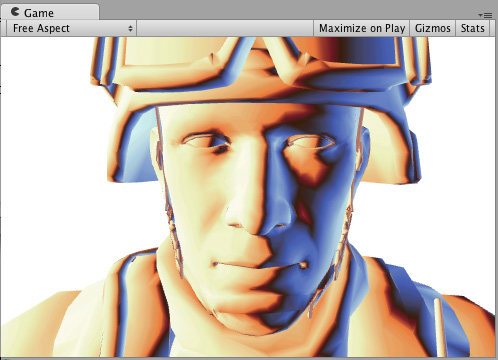
每顶点计算的自定义数据 使用顶点修改器函数,还可以在顶点着色器中计算自定义数据,然后将数据按像素传递给表面着色器函数。此情况下使用相同的编译指令 vertex:functionName,但该函数应采用两个参数:inout appdata_full 和 out Input。您可以在其中填写除内置值以外的任何输入成员。 **注意:**以这种方式使用的自定义输入成员不得包含以“uv”开头的名称,否则它们将无法正常工作。 下面的示例定义了一个在顶点函数中计算的自定义 float3 customColor 成员: ``` Shader “Example/Custom Vertex Data” { Properties { _MainTex (“Texture”, 2D) = “white” {} } SubShader { Tags { “RenderType” = “Opaque” } CGPROGRAM #pragma surface surf Lambert vertex:vert struct Input { float2 uv_MainTex; float3 customColor; }; void vert (inout appdata_full v, out Input o) { UNITY_INITIALIZE_OUTPUT(Input,o); o.customColor = abs(v.normal); } sampler2D _MainTex; void surf (Input IN, inout SurfaceOutput o) { o.Albedo = tex2D (_MainTex, IN.uv_MainTex).rgb; o.Albedo *= IN.customColor; } ENDCG } Fallback “Diffuse” } ``` 在此示例中,customColor 设置为法线的绝对值
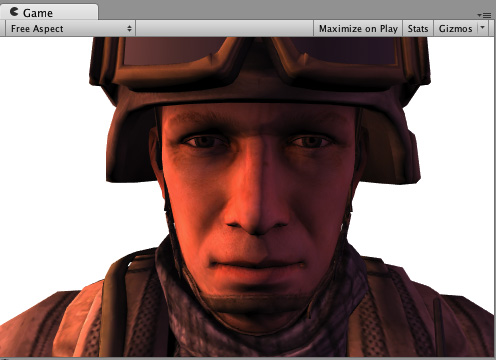
更实际的用途可能是计算内置输入变量不提供的任何每顶点数据;或优化着色器计算。例如,可以在游戏对象的顶点处计算边缘光照,而不是在表面着色器中按照每个像素进行计算。 ## 最终颜色修改器 可以使用“最终颜色修改器”函数来修改着色器计算的最终颜色。表面着色器编译指令 finalcolor:functionName 将用于此目的,其中的一个函数采用 Input IN, SurfaceOutput o, inout fixed4 color 参数。 下面是一个简单的着色器,它将色调应用于最终颜色。这与仅对表面反照率颜色应用色调不同:此色调还会影响来自光照贴图、光照探针和类似额外来源的任何颜色。 ``` Shader “Example/Tint Final Color” { Properties { _MainTex (“Texture”, 2D) = “white” {} _ColorTint (“Tint”, Color) = (1.0, 0.6, 0.6, 1.0) } SubShader { Tags { “RenderType” = “Opaque” } CGPROGRAM #pragma surface surf Lambert finalcolor:mycolor struct Input { float2 uv_MainTex; }; fixed4 _ColorTint; void mycolor (Input IN, SurfaceOutput o, inout fixed4 color) { color *= _ColorTint; } sampler2D _MainTex; void surf (Input IN, inout SurfaceOutput o) { o.Albedo = tex2D (_MainTex, IN.uv_MainTex).rgb; } ENDCG } Fallback “Diffuse” } ```
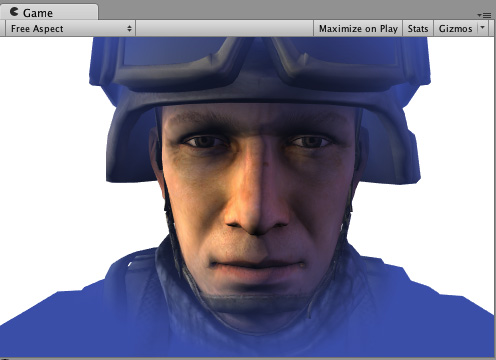
使用最终颜色修改器自定义雾效 使用最终颜色修改器(见上文)的常见情况是在前向渲染中实现完全自定义的雾效。雾效需要影响最终计算的像素着色器颜色,这正是 finalcolor 修改器的功能。 下面是一个根据与屏幕中心的距离应用雾效色调的着色器。此着色器将顶点修改器与自定义顶点数据 (fog) 和最终颜色修改器组合在一起。用于前向渲染附加通道时,雾效需要淡化为黑色。此示例将解决这一问题并检查是否有 UNITY_PASS_FORWARDADD。 ``` Shader “Example/Fog via Final Color” { Properties { _MainTex (“Texture”, 2D) = “white” {} _FogColor (“Fog Color”, Color) = (0.3, 0.4, 0.7, 1.0) } SubShader { Tags { “RenderType” = “Opaque” } CGPROGRAM #pragma surface surf Lambert finalcolor:mycolor vertex:myvert struct Input { float2 uv_MainTex; half fog; }; void myvert (inout appdata_full v, out Input data) { UNITY_INITIALIZE_OUTPUT(Input,data); float4 hpos = UnityObjectToClipPos(v.vertex); hpos.xy/=hpos.w; data.fog = min (1, dot (hpos.xy, hpos.xy)*0.5); } fixed4 _FogColor; void mycolor (Input IN, SurfaceOutput o, inout fixed4 color) { fixed3 fogColor = _FogColor.rgb; #ifdef UNITY_PASS_FORWARDADD fogColor = 0; #endif color.rgb = lerp (color.rgb, fogColor, IN.fog); } sampler2D _MainTex; void surf (Input IN, inout SurfaceOutput o) { o.Albedo = tex2D (_MainTex, IN.uv_MainTex).rgb; } ENDCG } Fallback “Diffuse” } ```
线性雾 ``` Shader “Example/Linear Fog” { Properties { _MainTex (“Base (RGB)”, 2D) = “white” {} } SubShader { Tags { “RenderType”=“Opaque” } LOD 200 CGPROGRAM #pragma surface surf Lambert finalcolor:mycolor vertex:myvert #pragma multi_compile_fog sampler2D _MainTex; uniform half4 unity_FogStart; uniform half4 unity_FogEnd; struct Input { float2 uv_MainTex; half fog; }; void myvert (inout appdata_full v, out Input data) { UNITY_INITIALIZE_OUTPUT(Input,data); float pos = length(UnityObjectToViewPos(v.vertex).xyz); float diff = unity_FogEnd.x - unity_FogStart.x; float invDiff = 1.0f / diff; data.fog = clamp ((unity_FogEnd.x - pos) * invDiff, 0.0, 1.0); } void mycolor (Input IN, SurfaceOutput o, inout fixed4 color) { #ifdef UNITY_PASS_FORWARDADD UNITY_APPLY_FOG_COLOR(IN.fog, color, float4(0,0,0,0)); #else UNITY_APPLY_FOG_COLOR(IN.fog, color, unity_FogColor); #endif } void surf (Input IN, inout SurfaceOutput o) { half4 c = tex2D (_MainTex, IN.uv_MainTex); o.Albedo = c.rgb; o.Alpha = c.a; } ENDCG } FallBack “Diffuse” } ``` ## 贴花 贴花通常用于在运行时向材质添加细节(例如,子弹冲击力效果)。贴花在延迟渲染中特别有用,因为贴花在照亮之前会改变 G 缓冲区,因此可以节省开销。 在常规情况下,贴花应该在不透明对象之后渲染,并且不应该是阴影投射物,如以下示例中的 ShaderLab“Tags”中所示。 ``` Shader “Example/Decal” { Properties { _MainTex (“Base (RGB)”, 2D) = “white” {} } SubShader { Tags { “RenderType”=“Opaque” “Queue”=“Geometry+1” “ForceNoShadowCasting”=“True” } LOD 200 Offset -1, -1 CGPROGRAM #pragma surface surf Lambert decal:blend sampler2D _MainTex; struct Input { float2 uv_MainTex; }; void surf (Input IN, inout SurfaceOutput o) { half4 c = tex2D (_MainTex, IN.uv_MainTex); o.Albedo = c.rgb; o.Alpha = c.a; } ENDCG } } ```
* \*\*\*\*表面着色器光照示例\*\*\*\*
因为延迟光照与一些自定义的每材质光照模型不兼容,所以下面的大多数示例都使着色器仅编译到前向渲染。
## **渲染管线兼容性**
功能名称
内置渲染管线
通用渲染管线 (URP)
高清渲染管线 (HDRP)
自定义 SRP
表面着色器
是
否有关在 URP 中创建 Shader 对象的简化方法,请参阅 https://docs.unity3d.com/cn/current/Manual/shader-graph.html。
否有关在 HDRP 中创建 Shader 对象的简化方法,请参阅 https://docs.unity3d.com/cn/current/Manual/shader-graph.html。
否
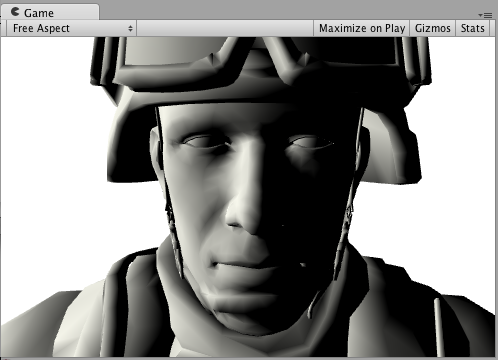
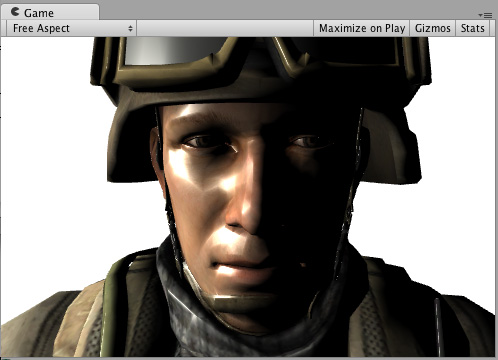
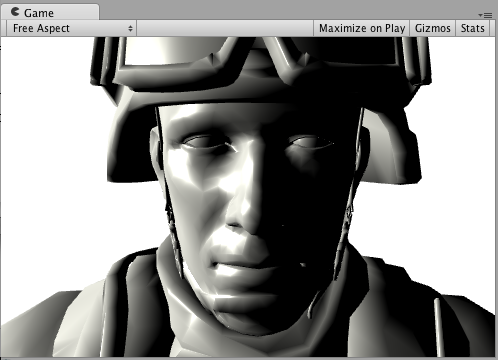
\## **Diffuse** 以下是使用内置兰伯特光照模型的着色器示例: \`\`\` Shader "Example/Diffuse Texture" { Properties { \_MainTex ("Texture", 2D) = "white" {} } SubShader { Tags { "RenderType" = "Opaque" } CGPROGRAM #pragma surface surf Lambert struct Input { float2 uv\_MainTex; }; sampler2D \_MainTex; void surf (Input IN, inout SurfaceOutput o) { o.Albedo = tex2D (\_MainTex, IN.uv\_MainTex).rgb; } ENDCG } Fallback "Diffuse" } \`\`\` 以下是有纹理和没有纹理的外观(在场景中使用一个方向光):

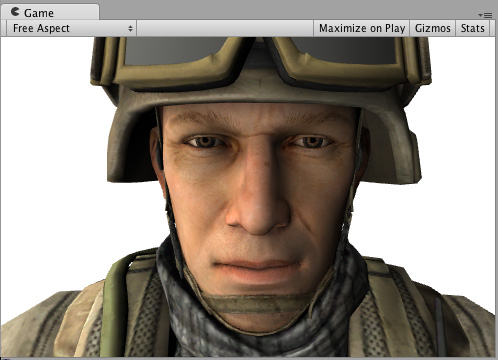
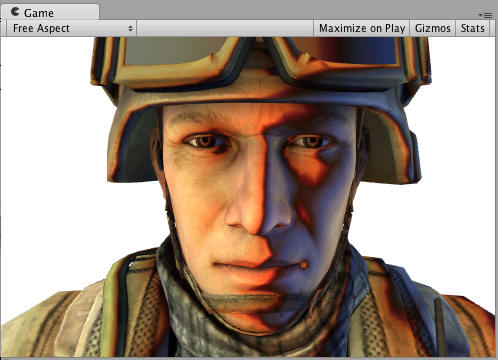
以下示例显示了如何通过编写自定义光照模型(而不是使用内置兰伯特模型)来实现相同的结果。 为此,您需要使用许多表面着色器光照模型函数。下面是一个简单的兰伯特光照模型。请注意,只有CGPROGRAM 部分发生变化;周围的着色器代码完全相同: ``` Shader “Example/Diffuse Texture” { Properties { _MainTex (“Texture”, 2D) = “white” {} } SubShader { Tags { “RenderType” = “Opaque” } CGPROGRAM #pragma surface surf SimpleLambert half4 LightingSimpleLambert (SurfaceOutput s, half3 lightDir, half atten) { half NdotL = dot (s.Normal, lightDir); half4 c; c.rgb = s.Albedo * _LightColor0.rgb * (NdotL * atten); c.a = s.Alpha; return c; } struct Input { float2 uv_MainTex; }; sampler2D _MainTex; void surf (Input IN, inout SurfaceOutput o) { o.Albedo = tex2D (_MainTex, IN.uv_MainTex).rgb; } ENDCG } Fallback “Diffuse” } ``` 这个简单的漫射光照模型使用了 LightingSimpleLambert 函数。它通过以下方式计算光照:计算表面法线和光线方向之间的点积,然后应用光衰减和颜色。 ## 漫射环绕 以下示例显示了环绕漫射,这是对漫射光照的修改,其中光照“环绕着”对象的边缘。它对于模拟次表面散射效果很有用。只有 CGPROGRAM 部分发生变化,这里同样省略了周围的着色器代码: ``` …ShaderLab code… CGPROGRAM #pragma surface surf WrapLambert half4 LightingWrapLambert (SurfaceOutput s, half3 lightDir, half atten) { half NdotL = dot (s.Normal, lightDir); half diff = NdotL * 0.5 + 0.5; half4 c; c.rgb = s.Albedo * _LightColor0.rgb * (diff * atten); c.a = s.Alpha; return c; } struct Input { float2 uv_MainTex; }; sampler2D _MainTex; void surf (Input IN, inout SurfaceOutput o) { o.Albedo = tex2D (_MainTex, IN.uv_MainTex).rgb; } ENDCG …ShaderLab code… ``` 以下是有纹理和没有纹理的外观(在场景中使用一个方向光):

卡通渐变 (Toon Ramp) 以下示例显示了一个“渐变”光照模型,该模型使用纹理渐变来定义表面如何响应光源和法线之间的角度。这可以用于各种效果,并且在与卡通光照一起使用时尤其有效。 ``` …ShaderLab code… CGPROGRAM #pragma surface surf Ramp sampler2D _Ramp; half4 LightingRamp (SurfaceOutput s, half3 lightDir, half atten) { half NdotL = dot (s.Normal, lightDir); half diff = NdotL * 0.5 + 0.5; half3 ramp = tex2D (_Ramp, float2(diff)).rgb; half4 c; c.rgb = s.Albedo * _LightColor0.rgb * ramp * atten; c.a = s.Alpha; return c; } struct Input { float2 uv_MainTex; }; sampler2D _MainTex; void surf (Input IN, inout SurfaceOutput o) { o.Albedo = tex2D (_MainTex, IN.uv_MainTex).rgb; } ENDCG …ShaderLab code… ``` 以下是有纹理和没有纹理的外观(在场景中使用一个方向光)

简单镜面反射 以下示例显示了一个简单的镜面反射光照模型,类似于内置的 BlinnPhong 光照模型。 ``` …ShaderLab code… CGPROGRAM #pragma surface surf SimpleSpecular half4 LightingSimpleSpecular (SurfaceOutput s, half3 lightDir, half3 viewDir, half atten) { half3 h = normalize (lightDir + viewDir); half diff = max (0, dot (s.Normal, lightDir)); float nh = max (0, dot (s.Normal, h)); float spec = pow (nh, 48.0); half4 c; c.rgb = (s.Albedo * _LightColor0.rgb * diff + _LightColor0.rgb * spec) * atten; c.a = s.Alpha; return c; } struct Input { float2 uv_MainTex; }; sampler2D _MainTex; void surf (Input IN, inout SurfaceOutput o) { o.Albedo = tex2D (_MainTex, IN.uv_MainTex).rgb; } ENDCG …ShaderLab code… ``` 以下是有纹理和没有纹理的外观(在场景中使用一个方向光)
自定义 GI 我们将从一个模仿 Unity 内置 GI 的着色器开始: ``` Shader “Example/CustomGI_ToneMapped” { Properties { _MainTex (“Albedo (RGB)”, 2D) = “white” {} } SubShader { Tags { “RenderType”=“Opaque” } CGPROGRAM #pragma surface surf StandardDefaultGI #include “UnityPBSLighting.cginc” sampler2D _MainTex; inline half4 LightingStandardDefaultGI(SurfaceOutputStandard s, half3 viewDir, UnityGI gi) { return LightingStandard(s, viewDir, gi); } inline void LightingStandardDefaultGI_GI( SurfaceOutputStandard s, UnityGIInput data, inout UnityGI gi) { LightingStandard_GI(s, data, gi); } struct Input { float2 uv_MainTex; }; void surf (Input IN, inout SurfaceOutputStandard o) { o.Albedo = tex2D(_MainTex, IN.uv_MainTex); } ENDCG } FallBack “Diffuse” } ``` 现在,让我们在 GI 上添加一些色调映射: ``` Shader “Example/CustomGI_ToneMapped” { Properties { _MainTex (“Albedo (RGB)”, 2D) = “white” {} _Gain(“Lightmap tone-mapping Gain”, Float) = 1 _Knee(“Lightmap tone-mapping Knee”, Float) = 0.5 _Compress(“Lightmap tone-mapping Compress”, Float) = 0.33 } SubShader { Tags { “RenderType”=“Opaque” } CGPROGRAM #pragma surface surf StandardToneMappedGI #include “UnityPBSLighting.cginc” half _Gain; half _Knee; half _Compress; sampler2D _MainTex; inline half3 TonemapLight(half3 i) { i = _Gain; return (i > _Knee) ?(((i - _Knee)_Compress) + _Knee) : i; } inline half4 LightingStandardToneMappedGI(SurfaceOutputStandard s, half3 viewDir, UnityGI gi) { return LightingStandard(s, viewDir, gi); } inline void LightingStandardToneMappedGI_GI( SurfaceOutputStandard s, UnityGIInput data, inout UnityGI gi) { LightingStandard_GI(s, data, gi); gi.light.color = TonemapLight(gi.light.color); #ifdef DIRLIGHTMAP_SEPARATE #ifdef LIGHTMAP_ON gi.light2.color = TonemapLight(gi.light2.color); #endif #ifdef DYNAMICLIGHTMAP_ON gi.light3.color = TonemapLight(gi.light3.color); #endif #endif gi.indirect.diffuse = TonemapLight(gi.indirect.diffuse); gi.indirect.specular = TonemapLight(gi.indirect.specular); } struct Input { float2 uv_MainTex; }; void surf (Input IN, inout SurfaceOutputStandard o) { o.Albedo = tex2D(_MainTex, IN.uv_MainTex); } ENDCG } FallBack “Diffuse” } ```
        # Unity5.0以上的PBR基于物理着色的光照算法

        💡 在CGIncludes文件夹当中的UnityStandardBRDF.cginc文件中

* UnityStandardBRDF.cginc完整代码 \`\`\` #ifndef UNITY\_STANDARD\_BRDF\_INCLUDED #define UNITY\_STANDARD\_BRDF\_INCLUDED </p></li> </ul> <p>#include "UnityCG.cginc" #include "UnityStandardConfig.cginc" #include "UnityLightingCommon.cginc" //----------------------------------------------------------------------------- // Helper to convert smoothness to roughness //----------------------------------------------------------------------------- float PerceptualRoughnessToRoughness(float perceptualRoughness) { return perceptualRoughness \* perceptualRoughness; } half RoughnessToPerceptualRoughness(half roughness) { return sqrt(roughness); } // Smoothness is the user facing name // it should be perceptualSmoothness but we don't want the user to have to deal with this name half SmoothnessToRoughness(half smoothness) { return (1 - smoothness) \* (1 - smoothness); } float SmoothnessToPerceptualRoughness(float smoothness) { return (1 - smoothness); } //------------------------------------------------------------------------------------- inline half Pow4 (half x) { return x<em>x</em>x\*x; } inline float2 Pow4 (float2 x) { return x<em>x</em>x\*x; } inline half3 Pow4 (half3 x) { return x<em>x</em>x\*x; } inline half4 Pow4 (half4 x) { return x<em>x</em>x\*x; } // Pow5 uses the same amount of instructions as generic pow(), but has 2 advantages: // 1) better instruction pipelining // 2) no need to worry about NaNs inline half Pow5 (half x) { return x<em>x \* x</em>x \* x; } inline half2 Pow5 (half2 x) { return x<em>x \* x</em>x \* x; } inline half3 Pow5 (half3 x) { return x<em>x \* x</em>x \* x; } inline half4 Pow5 (half4 x) { return x<em>x \* x</em>x \* x; } inline half3 FresnelTerm (half3 F0, half cosA) { half t = Pow5 (1 - cosA); // ala Schlick interpoliation return F0 + (1-F0) \* t; } inline half3 FresnelLerp (half3 F0, half3 F90, half cosA) { half t = Pow5 (1 - cosA); // ala Schlick interpoliation return lerp (F0, F90, t); } // approximage Schlick with ^4 instead of ^5 inline half3 FresnelLerpFast (half3 F0, half3 F90, half cosA) { half t = Pow4 (1 - cosA); return lerp (F0, F90, t); } // Note: Disney diffuse must be multiply by diffuseAlbedo / PI. This is done outside of this function. half DisneyDiffuse(half NdotV, half NdotL, half LdotH, half perceptualRoughness) { half fd90 = 0.5 + 2 \* LdotH \* LdotH \* perceptualRoughness; // Two schlick fresnel term half lightScatter = (1 + (fd90 - 1) \* Pow5(1 - NdotL)); half viewScatter = (1 + (fd90 - 1) \* Pow5(1 - NdotV)); return lightScatter \* viewScatter; } // NOTE: Visibility term here is the full form from Torrance-Sparrow model, it includes Geometric term: V = G / (N.L \* N.V) // This way it is easier to swap Geometric terms and more room for optimizations (except maybe in case of CookTorrance geom term) // Generic Smith-Schlick visibility term inline half SmithVisibilityTerm (half NdotL, half NdotV, half k) { half gL = NdotL \* (1-k) + k; half gV = NdotV \* (1-k) + k; return 1.0 / (gL \* gV + 1e-5f); // This function is not intended to be running on Mobile, // therefore epsilon is smaller than can be represented by half } // Smith-Schlick derived for Beckmann inline half SmithBeckmannVisibilityTerm (half NdotL, half NdotV, half roughness) { half c = 0.797884560802865h; // c = sqrt(2 / Pi) half k = roughness \* c; return SmithVisibilityTerm (NdotL, NdotV, k) \* 0.25f; // \* 0.25 is the 1/4 of the visibility term } // Ref: http://jcgt.org/published/0003/02/03/paper.pdf inline float SmithJointGGXVisibilityTerm (float NdotL, float NdotV, float roughness) { #if 0 // Original formulation: // lambda\_v = (-1 + sqrt(a2 \* (1 - NdotL2) / NdotL2 + 1)) \* 0.5f; // lambda\_l = (-1 + sqrt(a2 \* (1 - NdotV2) / NdotV2 + 1)) \* 0.5f; // G = 1 / (1 + lambda\_v + lambda\_l); // Reorder code to be more optimal half a = roughness; half a2 = a \* a; half lambdaV = NdotL \* sqrt((-NdotV \* a2 + NdotV) \* NdotV + a2); half lambdaL = NdotV \* sqrt((-NdotL \* a2 + NdotL) \* NdotL + a2); // Simplify visibility term: (2.0f \* NdotL \* NdotV) / ((4.0f \* NdotL \* NdotV) \* (lambda\_v + lambda\_l + 1e-5f)); return 0.5f / (lambdaV + lambdaL + 1e-5f); // This function is not intended to be running on Mobile, // therefore epsilon is smaller than can be represented by half #else // Approximation of the above formulation (simplify the sqrt, not mathematically correct but close enough) float a = roughness; float lambdaV = NdotL \* (NdotV \* (1 - a) + a); float lambdaL = NdotV \* (NdotL \* (1 - a) + a); #if defined(SHADER\_API\_SWITCH) return 0.5f / (lambdaV + lambdaL + UNITY\_HALF\_MIN); #else return 0.5f / (lambdaV + lambdaL + 1e-5f); #endif #endif } inline float GGXTerm (float NdotH, float roughness) { float a2 = roughness \* roughness; float d = (NdotH \* a2 - NdotH) \* NdotH + 1.0f; // 2 mad return UNITY\_INV\_PI \* a2 / (d \* d + 1e-7f); // This function is not intended to be running on Mobile, // therefore epsilon is smaller than what can be represented by half } inline half PerceptualRoughnessToSpecPower (half perceptualRoughness) { half m = PerceptualRoughnessToRoughness(perceptualRoughness); // m is the true academic roughness. half sq = max(1e-4f, m\*m); half n = (2.0 / sq) - 2.0; // https://dl.dropboxusercontent.com/u/55891920/papers/mm\_brdf.pdf n = max(n, 1e-4f); // prevent possible cases of pow(0,0), which could happen when roughness is 1.0 and NdotH is zero return n; } // BlinnPhong normalized as normal distribution function (NDF) // for use in micro-facet model: spec=D<em>G</em>F // eq. 19 in https://dl.dropboxusercontent.com/u/55891920/papers/mm\_brdf.pdf inline half NDFBlinnPhongNormalizedTerm (half NdotH, half n) { // norm = (n+2)/(2\*pi) half normTerm = (n + 2.0) \* (0.5/UNITY\_PI); half specTerm = pow (NdotH, n); return specTerm \* normTerm; } //------------------------------------------------------------------------------------- /\* // https://s3.amazonaws.com/docs.knaldtech.com/knald/1.0.0/lys\_power\_drops.html const float k0 = 0.00098, k1 = 0.9921; // pass this as a constant for optimization const float fUserMaxSPow = 100000; // sqrt(12M) const float g\_fMaxT = ( exp2(-10.0/fUserMaxSPow) - k0)/k1; float GetSpecPowToMip(float fSpecPow, int nMips) { // Default curve - Inverse of TB2 curve with adjusted constants float fSmulMaxT = ( exp2(-10.0/sqrt( fSpecPow )) - k0)/k1; return float(nMips-1)\*(1.0 - clamp( fSmulMaxT/g\_fMaxT, 0.0, 1.0 )); } //float specPower = PerceptualRoughnessToSpecPower(perceptualRoughness); //float mip = GetSpecPowToMip (specPower, 7); \*/ inline float3 Unity\_SafeNormalize(float3 inVec) { float dp3 = max(0.001f, dot(inVec, inVec)); return inVec \* rsqrt(dp3); } //------------------------------------------------------------------------------------- // Note: BRDF entry points use smoothness and oneMinusReflectivity for optimization // purposes, mostly for DX9 SM2.0 level. Most of the math is being done on these (1-x) values, and that saves // a few precious ALU slots. // Main Physically Based BRDF // Derived from Disney work and based on Torrance-Sparrow micro-facet model // // BRDF = kD / pi + kS \* (D \* V \* F) / 4 // I = BRDF \* NdotL // // \* NDF (depending on UNITY\_BRDF\_GGX): // a) Normalized BlinnPhong // b) GGX // \* Smith for Visiblity term // \* Schlick approximation for Fresnel half4 BRDF1\_Unity\_PBS (half3 diffColor, half3 specColor, half oneMinusReflectivity, half smoothness, float3 normal, float3 viewDir, UnityLight light, UnityIndirect gi) { float perceptualRoughness = SmoothnessToPerceptualRoughness (smoothness); float3 halfDir = Unity\_SafeNormalize (float3(light.dir) + viewDir); // NdotV should not be negative for visible pixels, but it can happen due to perspective projection and normal mapping // In this case normal should be modified to become valid (i.e facing camera) and not cause weird artifacts. // but this operation adds few ALU and users may not want it. Alternative is to simply take the abs of NdotV (less correct but works too). // Following define allow to control this. Set it to 0 if ALU is critical on your platform. // This correction is interesting for GGX with SmithJoint visibility function because artifacts are more visible in this case due to highlight edge of rough surface // Edit: Disable this code by default for now as it is not compatible with two sided lighting used in SpeedTree. #define UNITY\_HANDLE\_CORRECTLY\_NEGATIVE\_NDOTV 0 #if UNITY\_HANDLE\_CORRECTLY\_NEGATIVE\_NDOTV // The amount we shift the normal toward the view vector is defined by the dot product. half shiftAmount = dot(normal, viewDir); normal = shiftAmount < 0.0f ? normal + viewDir \* (-shiftAmount + 1e-5f) : normal; // A re-normalization should be applied here but as the shift is small we don't do it to save ALU. //normal = normalize(normal); float nv = saturate(dot(normal, viewDir)); // TODO: this saturate should no be necessary here #else half nv = abs(dot(normal, viewDir)); // This abs allow to limit artifact #endif float nl = saturate(dot(normal, light.dir)); float nh = saturate(dot(normal, halfDir)); half lv = saturate(dot(light.dir, viewDir)); half lh = saturate(dot(light.dir, halfDir)); // Diffuse term half diffuseTerm = DisneyDiffuse(nv, nl, lh, perceptualRoughness) \* nl; // Specular term // HACK: theoretically we should divide diffuseTerm by Pi and not multiply specularTerm! // BUT 1) that will make shader look significantly darker than Legacy ones // and 2) on engine side "Non-important" lights have to be divided by Pi too in cases when they are injected into ambient SH float roughness = PerceptualRoughnessToRoughness(perceptualRoughness); #if UNITY\_BRDF\_GGX // GGX with roughtness to 0 would mean no specular at all, using max(roughness, 0.002) here to match HDrenderloop roughtness remapping. roughness = max(roughness, 0.002); float V = SmithJointGGXVisibilityTerm (nl, nv, roughness); float D = GGXTerm (nh, roughness); #else // Legacy half V = SmithBeckmannVisibilityTerm (nl, nv, roughness); half D = NDFBlinnPhongNormalizedTerm (nh, PerceptualRoughnessToSpecPower(perceptualRoughness)); #endif float specularTerm = V\*D \* UNITY\_PI; // Torrance-Sparrow model, Fresnel is applied later <h1>ifdef UNITY\_COLORSPACE\_GAMMA</h1> specularTerm = sqrt(max(1e-4h, specularTerm)); <h1>endif</h1> // specularTerm \* nl can be NaN on Metal in some cases, use max() to make sure it's a sane value specularTerm = max(0, specularTerm \* nl); #if defined(\_SPECULARHIGHLIGHTS\_OFF) specularTerm = 0.0; #endif // surfaceReduction = Int D(NdotH) \* NdotH \* Id(NdotL>0) dH = 1/(roughness^2+1) half surfaceReduction; <h1>ifdef UNITY\_COLORSPACE\_GAMMA</h1> surfaceReduction = 1.0-0.28<em>roughness</em>perceptualRoughness; // 1-0.28\*x^3 as approximation for (1/(x^4+1))^(1/2.2) on the domain \[0;1\] <h1>else</h1> surfaceReduction = 1.0 / (roughness\*roughness + 1.0); // fade in \[0.5;1\] <h1>endif</h1> // To provide true Lambert lighting, we need to be able to kill specular completely. specularTerm \*= any(specColor) ? 1.0 : 0.0; half grazingTerm = saturate(smoothness + (1-oneMinusReflectivity)); half3 color = diffColor \* (gi.diffuse + light.color \* diffuseTerm) + specularTerm \* light.color \* FresnelTerm (specColor, lh) + surfaceReduction \* gi.specular \* FresnelLerp (specColor, grazingTerm, nv); return half4(color, 1); } // Based on Minimalist CookTorrance BRDF // Implementation is slightly different from original derivation: http://www.thetenthplanet.de/archives/255 // // \* NDF (depending on UNITY\_BRDF\_GGX): // a) BlinnPhong // b) \[Modified\] GGX // \* Modified Kelemen and Szirmay-Kalos for Visibility term // \* Fresnel approximated with 1/LdotH half4 BRDF2\_Unity\_PBS (half3 diffColor, half3 specColor, half oneMinusReflectivity, half smoothness, float3 normal, float3 viewDir, UnityLight light, UnityIndirect gi) { float3 halfDir = Unity\_SafeNormalize (float3(light.dir) + viewDir); half nl = saturate(dot(normal, light.dir)); float nh = saturate(dot(normal, halfDir)); half nv = saturate(dot(normal, viewDir)); float lh = saturate(dot(light.dir, halfDir)); // Specular term half perceptualRoughness = SmoothnessToPerceptualRoughness (smoothness); half roughness = PerceptualRoughnessToRoughness(perceptualRoughness); #if UNITY\_BRDF\_GGX // GGX Distribution multiplied by combined approximation of Visibility and Fresnel // See "Optimizing PBR for Mobile" from Siggraph 2015 moving mobile graphics course // https://community.arm.com/events/1155 float a = roughness; float a2 = a\*a; float d = nh \* nh \* (a2 - 1.f) + 1.00001f; #ifdef UNITY\_COLORSPACE\_GAMMA // Tighter approximation for Gamma only rendering mode! // DVF = sqrt(DVF); // DVF = (a \* sqrt(.25)) / (max(sqrt(0.1), lh)<em>sqrt(roughness + .5) \* d); float specularTerm = a / (max(0.32f, lh) \* (1.5f + roughness) \* d); #else float specularTerm = a2 / (max(0.1f, lh</em>lh) \* (roughness + 0.5f) \* (d \* d) \* 4); #endif // on mobiles (where half actually means something) denominator have risk of overflow // clamp below was added specifically to "fix" that, but dx compiler (we convert bytecode to metal/gles) // sees that specularTerm have only non-negative terms, so it skips max(0,..) in clamp (leaving only min(100,...)) #if defined (SHADER\_API\_MOBILE) specularTerm = specularTerm - 1e-4f; #endif #else // Legacy half specularPower = PerceptualRoughnessToSpecPower(perceptualRoughness); // Modified with approximate Visibility function that takes roughness into account // Original ((n+1)<em>N.H^n) / (8</em>Pi \* L.H^3) didn't take into account roughness // and produced extremely bright specular at grazing angles half invV = lh \* lh \* smoothness + perceptualRoughness \* perceptualRoughness; // approx ModifiedKelemenVisibilityTerm(lh, perceptualRoughness); half invF = lh; half specularTerm = ((specularPower + 1) \* pow (nh, specularPower)) / (8 \* invV \* invF + 1e-4h); #ifdef UNITY\_COLORSPACE\_GAMMA specularTerm = sqrt(max(1e-4f, specularTerm)); #endif #endif #if defined (SHADER\_API\_MOBILE) specularTerm = clamp(specularTerm, 0.0, 100.0); // Prevent FP16 overflow on mobiles #endif #if defined(\_SPECULARHIGHLIGHTS\_OFF) specularTerm = 0.0; #endif // surfaceReduction = Int D(NdotH) \* NdotH \* Id(NdotL>0) dH = 1/(realRoughness^2+1) // 1-0.28<em>x^3 as approximation for (1/(x^4+1))^(1/2.2) on the domain \[0;1\] // 1-x^3</em>(0.6-0.08<em>x) approximation for 1/(x^4+1) #ifdef UNITY\_COLORSPACE\_GAMMA half surfaceReduction = 0.28; #else half surfaceReduction = (0.6-0.08</em>perceptualRoughness); #endif surfaceReduction = 1.0 - roughness<em>perceptualRoughness</em>surfaceReduction; half grazingTerm = saturate(smoothness + (1-oneMinusReflectivity)); half3 color = (diffColor + specularTerm \* specColor) \* light.color \* nl + gi.diffuse \* diffColor + surfaceReduction \* gi.specular \* FresnelLerpFast (specColor, grazingTerm, nv); return half4(color, 1); } sampler2D\_float unity\_NHxRoughness; half3 BRDF3\_Direct(half3 diffColor, half3 specColor, half rlPow4, half smoothness) { half LUT\_RANGE = 16.0; // must match range in NHxRoughness() function in GeneratedTextures.cpp // Lookup texture to save instructions half specular = tex2D(unity\_NHxRoughness, half2(rlPow4, SmoothnessToPerceptualRoughness(smoothness))).r \* LUT\_RANGE; #if defined(\_SPECULARHIGHLIGHTS\_OFF) specular = 0.0; #endif return diffColor + specular \* specColor; } half3 BRDF3\_Indirect(half3 diffColor, half3 specColor, UnityIndirect indirect, half grazingTerm, half fresnelTerm) { half3 c = indirect.diffuse \* diffColor; c += indirect.specular \* lerp (specColor, grazingTerm, fresnelTerm); return c; } // Old school, not microfacet based Modified Normalized Blinn-Phong BRDF // Implementation uses Lookup texture for performance // // \* Normalized BlinnPhong in RDF form // \* Implicit Visibility term // \* No Fresnel term // // TODO: specular is too weak in Linear rendering mode half4 BRDF3\_Unity\_PBS (half3 diffColor, half3 specColor, half oneMinusReflectivity, half smoothness, float3 normal, float3 viewDir, UnityLight light, UnityIndirect gi) { float3 reflDir = reflect (viewDir, normal); half nl = saturate(dot(normal, light.dir)); half nv = saturate(dot(normal, viewDir)); // Vectorize Pow4 to save instructions half2 rlPow4AndFresnelTerm = Pow4 (float2(dot(reflDir, light.dir), 1-nv)); // use R.L instead of N.H to save couple of instructions half rlPow4 = rlPow4AndFresnelTerm.x; // power exponent must match kHorizontalWarpExp in NHxRoughness() function in GeneratedTextures.cpp half fresnelTerm = rlPow4AndFresnelTerm.y; half grazingTerm = saturate(smoothness + (1-oneMinusReflectivity)); half3 color = BRDF3\_Direct(diffColor, specColor, rlPow4, smoothness); color \*= light.color \* nl; color += BRDF3\_Indirect(diffColor, specColor, gi, grazingTerm, fresnelTerm); return half4(color, 1); } // Include deprecated function #define INCLUDE\_UNITY\_STANDARD\_BRDF\_DEPRECATED #include "UnityDeprecated.cginc" #undef INCLUDE\_UNITY\_STANDARD\_BRDF\_DEPRECATED #endif // UNITY\_STANDARD\_BRDF\_INCLUDED \`\`\`


...